Tuesday, 29 September 2015

How to make decorated letters


You wander into any cute home boutique- you know the ones I mean, they all seem carry a strong smell of sandalwood and are full of gorgeous little trinkets that I wish I could afford. Among the Yankee Candles and photo frames, you will often find wooden letters to decorate your window sills or book shelves with.  

I wanted an H and W to go in our bathroom and decided to avoid the heavily perfumed shop and set aside a rainy Sunday afternoon to create my own!  


You will need:
MDF letters- I got mine from an independent craft shop for £2 per letter. You can get them from most places like eBay, Amazon and Hobbycraft.  You could use cardboard letters if you wanted to, they are even easier on your purse.
PVA glue or wood glue. (I used wood glue)
Paint brush- use an old cheap one, glue will destroy any nice brushes! (I found this out the hard way)
Old magazines- a bit of creative recycling! I went for a nature theme, so went through old gardening, nature and home mags. 


How to customise your letters:
Rip up a stash of magazines, in a mixture of sizes. For more of a ‘shabby chic’ feel- tear, don’t cut!
If using wood glue, mix in a FEW DROPS of water to give a slightly more fluid consistency. Don’t make it too runny! Remember, you can always add more. 
Paint on your glue in small sections and stick the pieces of magazine straight onto the glued patch, remember to paint the glue over too, to seal and to give a shine. 
Leave your letters to dry. I covered the bottom of my letter too, so the edges don’t peel up.
And that’s it! I painted a & sign to go with mine. These add a unique little touch to your home decor which costs next to nothing! Another nice idea would be to use pressed flowers...


Hope you have a lovely week! 
Hana xx
Monday, 28 September 2015

How to make a crystal wrap pendent


And breathe...you've done it, Monday is over for another week! Luckily for me, Monday's are my work-from-home days so they tend to be spent in pajamas and drinking copious amounts of tea. After writing my nature notes for the paper I made a quick 'demo pendent' to show you guys!

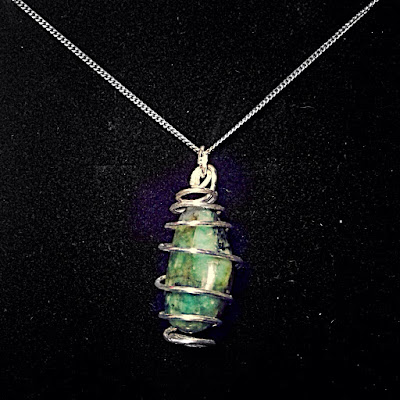
So the pendant above was a leaving present for my sister, Georgia, who has flown the nest to Newcastle University. The crystal inside is an Emerald, which is her birthstone (May). I bought it from my local 'spiritual shop', as I call it, Harvest Moon in Hitchin. These pendents are very easy to make and all the bits and bobs you'll need are pretty cheap and re-usable, so it's a win win.

You will need: 

  • Silver wire. I buy mine off amazon and prefer silver wire, rather than silver plated wire. It's a bit more expensive but lasts and doesn't loose it's shine! I get mine from Amazon at around £10 for 5 ft- you can make loads of jewellery with that! 
  • Jewellery making tools. Again, mine's an Amazon jobbie. I got the kit (with bits not in the photo) that you can see below for £15. 
  • A bead, crystal or whatever else you want to pop into your wrap! I cut up old bracelets or like for my sister's one, use a whole tumbler crystal.  

How to make a crystal wrap pendant:

Start by using your circular pliers to make a loop. Keep it attached to the main roll of wire for now. 

Then by keeping the loop secure with the flat pliers, begin to coil the wire around the loop. 


Keep coiling until you are happy with the size of the swirl. You will need to do this by eye, depending on how big your crystal is. If your crystal is 2 cm in height, you will need your first rolled coil to be 2 cms. 


Again, a little bit of a guess, but giving yourself a good enough length (remember it doesn't matter if it's too long, you can always trim it down!)cut the silver coil away from the rest of the silver reel. 

Then, starting at the end, just do exactly the same as what you did before! 

You should end up with this...


Both spirals don't have to be identical, it's all going to be part of the same spiral. Fold one loop over the other. So you are with something that looks like a clam.


Then using the coiling pliers that you started with, push and shape the spiral. 


(note to self: paint nails before taking photos.)

It may need a bit of pinching or pulling to get into the right shape!


Then, slip your crystal into one of the gaps and wiggle it in. Don't worry if it gets a bit stretched or wonky, you can easily bend it back with your tools. 


Then, using tweezers- eyebrow ones will do the trick, pull and bend one of your starting loops so that it's sticking up.

Then using one of these handy little fellas, attach it to the loop. 


And that's it! They make lovely presents with a personal touch. Maybe choose the person's birthstone or if you believe in the healing powers of a crystal, choose one that could give them a little helping hand. 

Here's one I made for one of my best friends, Rachel. She loves it and wears it all the time!


Have fun with this one, you will be surprised at how easy it is!

Good night! 

H xx


Sunday, 27 September 2015

Paul Hollywood's fruit loaf recipe


I was given Paul Hollywood's 'How To Bake' book from one of my friends at work, which came in handy because I need improve my bread making skills! 

I decided to choose the Fruit Loaf! It was delicious and perfect with a cuppa.


Ingredients

400g/14oz strong bread flour, plus extra for dusting 
1½ tsp salt 40g/1½oz caster sugar 
40g/1½oz butter, softened, plus extra for greasing
10g/¼oz fast-action dried yeast
120ml/4fl oz milk
50g/1¾oz sultanas
60g/2¼oz glacĂ© cherries
1 tsp ground cinnamon
oranges, zest only

Method

Put the flour, salt, sugar, butter, yeast, milk and 120ml/4fl oz of water into a bowl and stick your hands in and give it a mix. 

When all the flour has been incorporated, tip the dough onto a lightly floured work surface and knead until smooth and pliable.  


Return the dough to the bowl, cover with cling film and set aside to rest for an hour- I use an airing cupboard, or near a radiator.

Add the sultanas, cherries, cinnamon and orange zest (in mine I used lemon zest) to the dough and, using an electric mixer or your hands, work it in well. 

Shape the dough into a sausage shape by flattening out the dough and rolling it up. 

Put the dough on a greased baking tray. Slide the baking tray inside a plastic bag, to protect the dough from drafts, taking care not to allow the plastic bag to touch the top of the loaf. Leave to rise for an hour.

Preheat the oven to 220C/425F/Gas 7. 

Bake the dough for 25-30 minutes, then pop it on a wire rack to cool. A little tip is to know how bread is done, tap on the bottom, it should sound hollow.

While the loaf is cooling, make the water icing. Tip the icing sugar into a bowl, add a little water and mix well to form a paste. Gradually add more water until the icing is just thick enough to coat the back of a spoon.

Drizzle over the fruit loaf and to make it look extra pretty, sprinkle some zest.


Happy baking! H x  


Kirstie Allsopp's Handmade Fair- Hampton Court Palace

Hello again, I am blogging like mad today!

So it's a little late I know, but this day out was far too good not to write about. Last Saturday Will and I popped to Hampton Court Palace for The Handmade Fair presented by Kirstie Allsopp.

There was a bit of a vintage theme to the women wandering about the tents and everyone seemed to be wearing homemade pieces and clothes- Hampton Court Palace received it's fair share of inspiration for that weekend.


As well as neat little stalls selling gorgeous handmade jewellery, crafting books and reams of pretty material in what seemed to be an Aladin's cave-tent, classes were available throughout the day. We were taken back to art class with Zeena Shah in our lino printed stationary class and made fabric twine vases with Hester Van Overbeek, which is the best way to up cycle unwanted clothes and material!


One of my true loves in life is jewellery, my motto being you can never have enough. But sometimes I find handmade jewellery is the best because it has someone's passion built into it. I know that's a bit deep but if you think about it, it's true! I met the wonderful Karen Fox who makes stunning Elizabethan  inspired pieces. I spoiled myself and bought a solid silver ring which was modelled on Elizabethan collars. What do you think? 


So this is my slightly bodged and rushed attempt of a fabric twine vase! I spent too much time chatting so my twine wasn't quite long enough (2 metres) so I improvised… 


Would totally recommend it, the food was great, the cocktail bar was even better and the produce on offer was top notch. Sadly I missed the lady herself as we got there slightly later, will have to watch Kirstie's Handmade Home to make up for it! ;) 

How to make Hester's Fabric Twine Wrapped Vase

Materials

  • A jam jar- a mason jar would look pretty awesome
  • Glue gun or superglue- I would recommend the glue gun 
  • Plenty of fabric or canvas ripped into strips. (For mine I used quite thin material)
  • Scissors

Method

Pair two strips of material, if you are using thinner material they can between 1.5 and 2 inches, if thicker material then maybe stick between 1 and 1.5 inches. The strips don't have to be perfectly straight either, I quite like the messy look!

Knot your first two strips together. Make sure one is a few inches or so longer than the other, don't worry, it will all become clear :) 

Holding the knot in one hand and hold one strip away from you and twist it on it's self twice. Then pull it over the other strip.

Repeat the twisting on the other strip and then pull over the other. It's like plaiting but with two pieces rather than three. 

Keep wrapping and folding tightly and through some magical power, the strips bind together. To check that it's working, let go of the twisted strips and just hold the knot and see if they stay together, if they do- you're doing good. 

When you come have ran out of the shorter strand, you should be left with a few inches extra from the other. Flatten the remaining end strand and pick up a new strip of material. Pop the start of new piece on top of the remaining strip.

Fold the bottom strip around the new strip, making sure the new strip is wrapped inside.

You may need to adjust the newly wrapped strand to assure it won't slip out.

Continue to twist as before. 

Do this until you have 2 meters (this would be for a standard jam jar, if you are using a mason jar or something larger then you will need another half a meter or so. 

Once you've reached your perfect length, knot the same as you did in the start. Glue one knot to the bottom of your jar. Wrap around the jar so that the glass is covered. Glue again at the top to secure.

And done, a cute vase or pot for your pens and pencils!
I hope Monday treats you well, 

Hana xx    


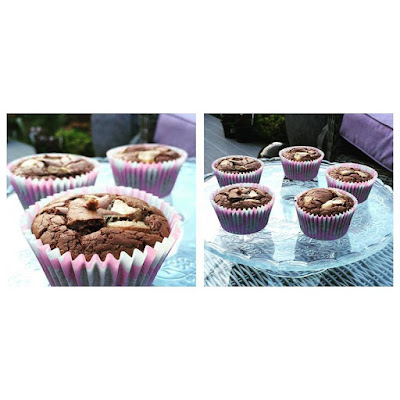
Nutella Chunk Brownie Cupcakes (with three and a half ingredients!)

Happy Sunday!

Today was spent filling the house with the sweet smell of chocolate, as well as setting up this blog! I thought I would jump on the band wagon with this whole 'three ingredient craze' that seems to be everywhere right now.

I was slightly skeptical of these so called magical cakes, so I decided to give the Nutella brownie a try ( and if it failed I could just eat the Nutella out of the jar with a spoon).

Much to my amazement, these incredibly thrifty bakes work and taste amazing. My favorite trick to play is to get people to guess the ingredients, but I thought I would make it easier for you guys...


Ingredients

  • 400 g Nutella or chocolate hazelnut spread
  • 2 eggs 
  • 70 g self raising flour 
  • And for my 'half' I would say these are more of an addition to the cake, so they don't really count... Broken up chocolate of your choice- I went for Milky Bar (obviously)

Method 

Before doing any baking, always line the tins first. I always forget to do that and my cake mix ends up sitting on the side, which (insert scientific cakey reason here) is bad for cakes. That way, if it's already taken care of, it makes this recipe even simpler!

Pre heat the oven to 180 degrees Celsius. 
  
Empty the 400 grams of Nutella into a mixing bowl and add the eggs.

Using an electric whisk mix in the eggs.

Add in the flour and mix again. I never bother to sieve my flour, lazy habit I suppose. 

Using a spoon, stir in the broken chocolate. Then spoon the mixture into a tray bake tin or into individual cupcake cases. Pop them in the oven for 20 minutes, check and if they are still a bit wobbly, another 5.
These little beauties went down a storm at work and were super easy to do. It's also a great little sweet treat to make with the kids, easy peasy!

Enjoy! H xx


My very first post!


Lovely to meet you! I'm Hana, I live in London and I'm a journalist.

This blog is an art hub, it's a space for me to share recipes, craft ideas and teach sugar craft. As well as sharing my own work I will be searching the UK for crafters, cake makers, knitters, anybody that 'makes' to tell their stories and share their art (edible or inedible). 

Rewind to the 90s, it's Christmas. My Mum, sister and I would be in the kitchen. The house is filled with trays of handmade sweets, stacks of decorated boxes and slightly hap hazard handmade cards. This was always the way during the lead up to the festive period. Christmas crafting would kick off in November, the craft boxes would come out, and within no time, our fingers covered in glue and glitter.  


That was the beginning of my 'homemade obsession' that never went away. Now, in 2015 and into my early twenties, my Christmas time routine is still very much the same, and the rest of the year seems to be covered in glue and glitter too.


Keep crafting! H xx