Thursday, 25 August 2016

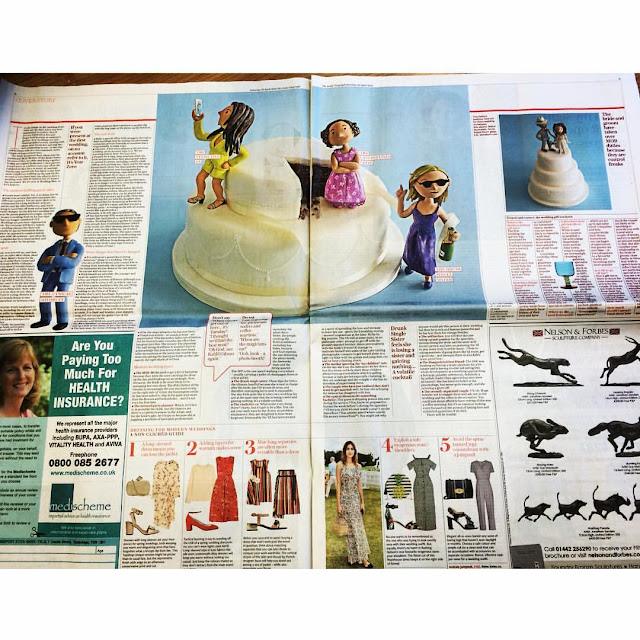
I swapped words for cake. {My iced debut in The Telegraph}


I was very fortunate to call the newsroom of The Telegraph my home for a year or so. I have since moved on, but to finish on a high note some popped a pretty cool question.

The weekend team were aware that I was the office's 'Cake Girl', as I would often wander around annoying people by offering sugary treats as they were writing about Syria or Brexit. 

So the editor asked if I'd fancy making the wedding cake for the "ultimate wedding survival guide" weekend spread. 

http://www.telegraph.co.uk/women/life/the-ultimate-modern-wedding-survival-guide-what-to-wear-bring-an/

Of course, I said yes.


The lady behind these incredible cake toppers is Clare Basham Designs and she is wonderfully talented.
Each pearl is hand piped and as I knew the dolls would be very bold and colourful, I wanted to give them a nice canvas. So I opted for classic white.


One year older, none the wiser - I'm back!


The space of 6 months I have aged by one year, become a qualified journalist, crashed my car, got another tattoo and have decided to learn how to skateboard.


{Poppy Merlin, may she rest in peace}


The awesome bunch that I spent my evenings and Saturdays with. My favourite thing to take away from that experience is to write shorthand when you're on the tube. It gets some pretty varied reactions. One bloke got up and sat somewhere else because he clearly thought I was a spy.

Recipes and artsy tricks are coming your way. H xxx


Tuesday, 2 February 2016

I'm on my holiblogs!


I thought that it would be rude to just disappear so to be delightfully English and polite this is a note to say I'm going to take a break from blogging for a while. A 'blogiday' if you will.

I'm juggling writing as well as my journalism course which has all become incredibly intense - I officially have no life, which sadly means my blogging material is a tad on the slim side! 


Once exams are out the way and I'm no longer a quivering wreck I will be back with new projects, interviews and reviews. If you would like to be featured {or your work to be featured} in my blog don't be shy, drop me a line - hana.carter@telegraph.co.uk 

I'm still alive as far as twitter is concerned! -https://twitter.com/HanaMayCarter and you can catch me on instagram: hanamaycarter

H xxx

Saturday, 2 January 2016

Salted caramel recipe


Hello 2016, you pretty little thing. 

I officially disappeared over the holidays and I'm not sorry one bit. I feel like a new woman ready to take on the new year! 

{My beautiful little sisters on Christmas day}

I've had a wonderful Christmas and new year, spent lots of time with the family and got around to transforming my garage into a sort of studio space {'studio' being a very fluid concept.} 

Rather than giving something up for new year, I've decided on things that I would like to achieve. I sat down in front of the fire, 'Up' on the TV {sob} and wrote a list for motivation- bloody love a list.

Anyway! Back to salted caramels... I was given a book on how to make 'old fashioned' type sweets so thought I would pick a recipe to make for Christmas presents. I don't think I've ever met someone who would turn away a salted caramel, so I thought they were a good option. They took about 35 minutes plus overnight cooling.


You will need:

  • Oven tin: 20cm L, 15cm W.
  • Greaseproof paper
  • Thermometer- I got mine for £6 from Amazon, mine is marketed for meat but does the same thing. 
  • Jars and cellophane 
  • 1 tsp vanilla extract
  • 380ml double cream
  • 400g granulated sugar
  • 240ml golden syrup
  • 55g unsalted butter
  • 15g sea salt flakes 


How to make:


Line the baking tray with greaseproof paper. 

Pop the golden syrup, butter, sugar, vanilla and half the salt in a LARGE pan. The reason for the emphasis is I used a pan which was too small and it bubbled over everywhere. Use the biggest pan you can find! 


Keep on a steady heat and wait until the ingredients have all melted. Add the cream in small amounts, stirring as you add. 


Increase the heat to medium-high and allow the mixture to boil without stirring. As the caramel cooks, use a pastry brush dipped in a little water to wash down the insides of the pan to stop crystals from forming- they give the caramel a weird texture. 

Keep testing the caramel until it reaches 121c. Once it is hot enough, remove from the heat and pour into the tin. Pop any air bubbles with a toothpick or sharp knife. 


Once almost cooled, sprinkle over the remainder of the salt. Leave in a cool dry place overnight. The next day, cut the caramel into small squares and wrap in pieces of non-stick baking paper or cellophane.  


H xx


Thursday, 10 December 2015

Spiced and simple mulled wine recipe


I went to a Christmas market in Winchester a few weeks back, it was like a scene from a Christmas card. Markets are one of my favourite parts of the festive season, sleepy villages spring to life with decorations and twinkly lights. I spent far too much money {mainly on myself which makes it even worse} but I was able to pick up a few bits for friends and family. 


I'd never really had mulled wine before, I'm not a huge lover of red wine- always goes too my head far too quickly. But as we walked past a wooden hut adorned with fairy lights, the sweet, spiced smell convinced me to have a cup. 


I've now been converted. I, Hana Carter, am a huge fan of mulled wine. 

When I like something I can often become obsessed with it- I'm swaying on my chair with a bottle of red as I type this. 

I joke. 

But I did decide to make my own...


You will need:

  • I only wanted to make one bottle so I only used one bottle of red. 
  • 3 large oranges
  • 100g Brown sugar- granulated 
  • 3 apples
  • 4 cloves
  • 2 cinnamon sticks 
  • 4 black cardamon pods
  • 100g Dried cranberries 
  • 80g Dried ginger 
Or you can buy mulled wine spice mixes from most food shops. Most will contain the ingredients in bold. 


 How to make:

Pour the wine into a pan and slowly heat. Add in the sugar and stir until dissolved. 

Slice up chunks of apple and orange and throw them in. Leave one orange half and squeeze into the wine. Then add to the pan. 


Add your spices and berries to the wine and stir. 

Leave on a low heat for an hour {or more!} and by then all the gorgeous flavours will have transformed the wine. Christ I sound like Nigella minus the cleavage. 

Using a sieve, strain the fruit and spices so you are left with just the wine.

If you are going to pop yours in a bottle for a Christmas present, allow it to cool down completely. Then store as you would normal red wine. 

Enjoy! H xxx 


Friday, 4 December 2015

Sarah & Teeken's 25 days of tea!


I have experienced first hand just how lovely it is to receive something that has been handmade especially for you.  

One of my best friends called me and gave me strict instructions that I had to come over and open a present on December 1st. As any sane person would act when forced to open a present, I willingly obliged. 

Sarah and Teeken had made me my own advent calendar, but with a twist. Every day contained a different variation of tea bag with a hand written quote. The girls had made the whole thing themselves and obviously put a lot of time into it, which almost made me cry! {I'm very soppy these days}


You will need:

  • MDF or lightweight wood panel. You could upcycle an old floorboard? 
  • Nails and a hammer 
  • Rope {thin but strong enough to hold the weight}
  • Pouches- they got theirs from Amazon.
  • Black paint and thin paintbrush- acrillic 
  • The fillings of your advent calendar
  • Your choice of material to cover your wood
  • Drill

How to make:

Cover your wood in your choice of material. The girls used Indian newspaper for me- to go with the tea theme and my job! If you are using MDF, PVA glue should do the job if you are covering it in paper. 

Mark out 25 points to hammer your nails into and give them a good old bash!

Sarah individually painted the numbers onto the little bags. Fill the bags with the contents of your choice. Little chocolates maybe? 

These calendars are also perfect for kids or adults {you're never too old for a advent calendar} who can't eat chocolate. Another nice idea would be to fill each bag with lego or something they can collect over December. 

I've got a collection of crystals, I believe that each crystal has a healing property. So that would also be a nice idea, fill each bag with a different crystal {you can pick them up for a few quid} and the properties they contain. 

My calendar is hanging on my wall, the girls drilled two holes in the top and attached thin rope through the holes. 

Like I said, this was Sarah and Teeken's creation so my instructions are a little ropey!

Thanks girls, they cheer me up every morning! 


Have a lovely weekend! H xxxx


Sunday, 29 November 2015

Nordic Bakery and honning hjerter {honey hearts} recipe


Nordic cooking is something I know very little about. I wandered past the Nordic Bakery after meeting for lunch with a friend and felt drawn to the place. I decided that I should learn more about Scandinavian food so had a little chat with Miisa Mink, the proud owner of Nordic Bakery and author of the Nordic Bakery Cookbook.


Meet Miisa Mink (Creator and Author) 

Miisa has a background in branding and design, which comes across in the interior of the bakery. The panelled wood walls and minimalistic tables and chairs gave the place an effortlessly styled feel. Miisa became a partner of Nordic Bakery in 2008 when she decided she needed a break from the branding industry. She had two words in her mind- beautiful and silent, two words that wouldn't usually spring to mind in a busy bakery... but somehow she has achieved just that. 

I was intrigued to hear what Miisa's childhood was like in Finland, she smiled: "I grew up in a foodie family. My parents made everything from scratch. We did our own fishing, picked berries, mushrooms and foraged. Nothing was out of a packet"

Her Dad has his own mill to make bread, he even travels to France to source the grain. The idea of a ready meal in the house was practically a sin, which explains her incredibly healthy {and rather inspirational cooking and eating style}

Miisa has hopped from Poland, Holland, Finland, Belgium and Switzerland until she made London her home in 1999.


The Nordic Bakery Cookbook

I feel I can speak for most people when I say that one year olds can be tricky. Now double that {Miisa is a mum of twin boys} and throw writing a cookbook into the mix! Miisa's cookbook came out in 2011 and is filled with sweet and savory Nordic recipes. She would invite her friends and family over for parties and get them to sample her food, one of her aunt's recipes is even in her book! I really have no idea how she does it! 


Tell me about Nordic food

I held my hands up and confessed that I knew very little about Nordic baking or cooking. She reassured me by saying it was actually very easy {this is a girl who struggles to make a decent boiled egg}. Nordic food is hearty and fresh. 'No nonsense cooking' as Miisa put it. I liked the tradition behind it, Miisa told me that everyone has their own take on the cinnamon bun and no one knows who came up with the original recipe, it is property of the Nordic people. Inspired by Miisa's baking and cooking, I thought I would give it a go!


{My honning hjerter}
Honning hjerter {honey hearts}

These biscuits can be traced back to the middle ages, which I think is pretty awesome. They are very simple {as my recipes always are} and go perfectly with cup of tea to warm you up over the winter months. They also make lovely Christmas tree decorations, just add a hole in the top before baking.  

You will need:

  • 500g Honey {I used runny honey}
  • 3 Eggs yolks 
  • 600g plain flour 
  • 2 tsp Baking power
  • 1/2 tsp baking soda
  • 2 tsp ground cinnamon 
  • 2 tsp ground allspice
  • 300g dark chocolate 

How to make:

Pre heat the oven to 170 degrees. Mix the honey and eggs in a bowl. I find the best way to separate the egg yolks is to crack the eggs and pour it onto my hands, letting the egg white drip through my fingers to I'm just left with the yolk... yummy. 

Add the spices and raising agents. Gradually add in the flour- you will need strong arms for this bit! 


Line a baking tray with greaseproof paper. 

You will need to COVER the surface with flour, I also found that the dough can be a little wet, if you kneed it onto the heavily floured surface it should do the trick. 

Roll the mixture onto the surface, you want a 1.5cm thickness, make sure to keep turning it and keep adding flour to the surface or it will stick. 


Quick tip: cut out your shape, give it a wiggle on the surface. Use a pallet knife to slide it under the cutter and bring it over to the tray. It just stops the dough sticking. 

Evenly space the biscuits and pop in the oven for 12 minutes. You want them to be slightly golden with a spongy texture when they come out, the honey then hardens them as they cool. 

Let the biscuits cool until you can touch them without burning your fingers, then peel them off the greaseproof. You will need to do this before they cool completely because they will stick to the paper. 


Leave them on a cooling rack. Melt the chocolate in a glass bowl over boiling water in a pan. 

Traditionally you cover the whole biscuit with chocolate, I decided to put my own spin on it. Using a spoon I drizzled the biscuits with the chocolate and spinkled them with golden sugar specks {sainsburys!}


Once again, the guys from work were my taste testers and they got the thumbs up! 

Enjoy xxx