Tuesday, 20 October 2015

Turn your jeans into a wheat bag!


It's that time of the year when everyone seems to be dropping like flies. Everywhere I go I'm followed by constant sneezes, bunged up noses and sniffles. When you're poorly you just want to get cosy on the sofa in your jim jams so I've made the ultimate lavender scented sickness buddy. 

Throughout my life I've always had a wheat bag, you know, one of those things you bung in the microwave and cuddle up with. They are also my first point of call when I have any aches or pains!  

These are super easy to make and a great way to recycle your old jeans or jumpers!


You will need:

  • Cotton based jeans or a jumper sleeve
  • For your filler you can use: Uncooked rice, wheat, oats, seed feed. {I used rice}
  • Sewing machine or hand sew with needle and thread
  • Lavender {you can use other scents!}
  • Lavender oil  
  • Dress makers pins

How to make:

Cut one of the legs or sleeves of your jeans or jumper to a legnth you would like your bag to be. Give yourself an extra inch for when you sew.


Turn the material inside out and fold over each end and pin down. 


I still don't own a sewing machine {it's on the wish list!} Sew above the pins, making sure your stitches are close together. 

Do the same for the other end but leave a gap of 2 inches. 

Turn your fabric back the right way by feeding it through the gap you've left. 

Then in a bowl mix your filling with picked lavender and 5 drops of oil. Use a funnel and pour the mix into the bag. 

Sew up the 2 inch gap and if you have a little label then you can stick that in there too! I've got little cute ones I ordered online which say 'handmade by Hana' on. 

And that's it! I wanted to keep mine simple but you can decorate these in any way you choose- just check the material is microwavable. 


Hana xxx


Sunday, 18 October 2015

Pumpkin spiced cake with cinnamon frosting


Pumpkin is a magic ingredient in cakes, it gives a super moist texture and goes amazingly well with spices. 

Quite a few recipes will tell you to use canned or tinned pumpkin {I'm not even sure if we have that in the UK?} but I think it's much nicer to use a fresh pumpkin. If you want to make it extra special, pick your own!  

I've never used one of these tins before and wondered where they originated. Turns out bundt {the d is silent} tins originated in Germany, Austria and Hungary and were called bundkuchen. 


You will need:

  • 290g Plain flour
  • 2 tsp of baking powder
  • 2 tsp of baking soda
  • 2 tsp of ground cinnamon 
  • 1 tsp of all spice
  • 1/2 tsp ground ginger
  • 1/2 tsp salt
  • 330g pumpkin
  • 4 eggs
  • 230g unsalted butter 
  • 130g granulated sugar
  • 35g brown sugar
  • 190ml buttermilk 
  • 1 tsp vanilla
{For the frosting}
  • 200g icing sugar
  • 50g royal icing sugar 
  • half a tub of cream cheese
  • 50ml buttermilk
{Cinnamon dusting}
  • 1 tbsp fine brown sugar
  • 1 tbsp ground cinnamon


How to make:

Pre heat your oven to 180 degrees Celsius and grease your tin with butter.

Weigh out your pumpkin {cut into slices and remove skin} and steam until soft. Should take about 20 minutes. Leave aside to cool.

Whiz the pumpkin down with a blender or food processor and mix with the vanilla and buttermilk. Leave on the side. 

Cream the sugars with the butter until pale and fluffy. Add eggs in gradually. Mix in flour, raising agents and spices.

Combine both mixes together. Line a tin with foil, put the seeds in the tin and cover with brown sugar . 

Pour the mix into the bundt tin and pop in the oven for 40 minutes and the seeds for 15. 

Whilst the cake is in the oven mix together the icing ingredients, make sure it's not too runny- if it is then throw in some more icing sugar. 

Spoon on the icing and allow it to trickle down. Sprinkle the cinnamon sugar over the icing then the seeds.


I enjoyed a cheeky little slice of this with my best friend and it was the first time she had pumpkin cake and she loved it! 

Have a good week! H xxx


Saturday, 17 October 2015

Fabric notebook holder {the 'list maker's' best friend}


I am a serial list writer. On a scary level. My desk is littered with post it notes, scraps of paper with 'TO DO' scribbled across the top of a list that is physically impossible to achieve in a day. So I thought I would make myself a pouch to keep my notepad and pen together.

There was a little bit of making up the rules as I went along but I'm happy with how it turned out!

{I'm going to keep my shorthand notebook in mine!}

You will need:

  • 2 A4 sheets of felt- 50p per sheet in Hobbycraft! 
  • Fabric scissors or decent kitchen scissors
  • A hairband
  • embroidery/ thick thread
  • Thick sewing needle 
  • A button

How to make:

Fold one sheet of felt in half. With the other piece of felt choose the size you would like the pocket to be. Cut it out.

Work out where you would like your button to be and stitch it onto the front of your folded felt, I used with the thinner needle and thread. On the back line up a hairband and stitch in place. 

Cut a smaller pocket for your pen holder. I chose a heart. N'awww.
Make two slits for your pen to slide into.

Stitch the heart onto the pocket. Stitch the pocket into your folded felt {I used a thinner needle and thread because the holes were too small}. 

Decorate which ever way you choose and you're all set! Have a lovely weekend! I've got a new instagram account so feel free to follow: @hanamaymakes 


H xx 


Thursday, 15 October 2015

Hana has Tea with Jud!

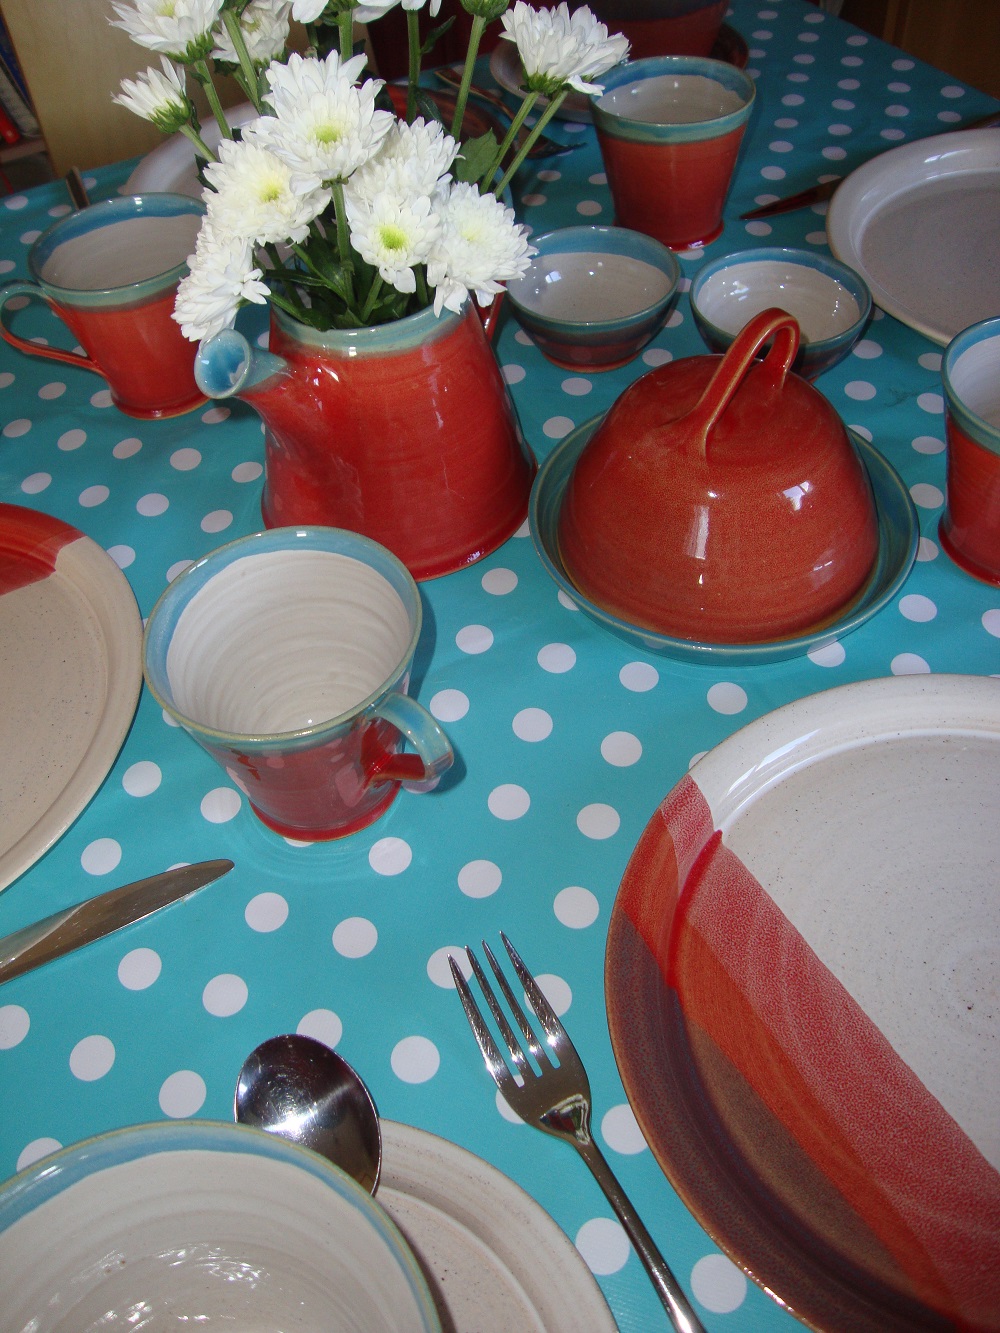
{Jud's handmade breakfast spread}

Many moons ago I embarked on a 6 month adventure and worked in Tignes in France on a ski season. It was there that I met the wonderful Jud Pollock. On a season you have very little time to just do nothing, but for the Skiworld seasonaires of 2011 the down time craze was knitting and the queen of knitting was Miss Pollock. Jud is the founder of Tea with Jud, an online shop for her fabulous pottery and knits.


{Tignes 2011- Me, Jud and the gang on Christmas day!}


Meet Jud!

Jud lives in Scotland on a fruit farm in Blairgowrie, Perthshire and attached to her house is her own pottery workshop, which she and her friends converted with their bare hands!  Jud makes and sells knits and pots through her online shop http://teawithjud.com but this Irish chick has her sights set on her very own coffee shop and hot drinks won’t be the only thing on the menu. 


Jud’s story

Jud was born in Belfast and grew up in Randalstown, Northern Ireland. She grew up in a creative family and was taught to knit at the age of four by her Mum (cute!)  I was very jealous to hear that Jud took needlework classes at school. She laughed and told me: “I just loved making things when I was little. As long as I was making things I was happy!” After leaving school she took an art course at college and then studied 3D design and business at Manchester Met. 


How did you learn to make pottery?

She learned how throw (pottery made on a wheel, not smashing up plates) at uni.  She saved up the money she made from selling her knitted hats to buy a second hand pottery wheel in 2013.  This wheel has made mugs, bowls, butter dishes, plates, teapots, jugs and cutlery dishes *BREATHE* which can all be found and bought on her website.


{Personalised mug for a customer's teacher}


From coffee shops in Belfast to chalets in the Alps

The idea of running her own coffee shop began when Jud worked as a supervisor in an independent coffee shop called Clements for 4 years.  To get more business and managerial experience, for 3 years every winter she would work in the Alps as a chalet host and manager.

{Jud on the far left and wearing one of her hats}


Jud’s Scottish travels

Jud hopped from the Alps in the winter to Scotland in the summer were she managed a youth hostel in Tongue, on the north coast of Scotland. It gave her a chance to explore the area and she fell in love. “There was no TV and I was in the middle of nowhere so it gave me a chance to do lots of knitting and exploring!” 


                        {Jud's youth hostel}

She was so inspired by Scotland that she decided to make a permanent move to set up her dream coffee shop, where of course she will be selling her knits and pots.  

{The fruit farm!}

{Hard at work creating her workshop}

Her words of wisdom for any crafters wanting to make a living from their crafts: “Just keep going. It doesn’t matter how long it takes you to get there, you’ll get there in the end.”


{Tea with Jud workshop on the fruit farm}

Take a peek at her website for her knits, pots and hilarious blog. 

H xx 

Tuesday, 13 October 2015

How to make a sugar rose


Woooohoooo my sugar florist paste arrived which means I can start to introduce you to the wonderful world of sugar craft and cake decorating! So I thought I would start where I began, with a rose. Roses look beautiful on cakes and for wedding cakes they are the most requested flower. These flowers will also last forever, so if you have some on your wedding or occasion cake it will be a keepsake for when the cake has been gobbled up!

I'm going to teach you how to make a simple rose. It looks fiddly, but trust me, once you've got the hang of it you will be making these with your eyes closed. 


You will need:

Sugar florist paste- I use Squires Kitchen's sugar florist paste. It's a little pricey, but it goes a long way!

Ball tool- You'll find these in craft stores with a baking section or online. I am using a plastic one but I would say ones with a metal ball are better. Top tip with a ball tool- keep it dry and clean!

Icing rolling pin- smooth plastic not wooden!

Polystyrine bud (1 per flower)

1 small and 1 medium petal cutters- Metal... always metal!

Icing sugar- I put mine in a shaker

5 petal cutter- best to get these online

Icing colouring- Sugarflair or AmeriColor are the best, they are £2-3 each but you use such a tiny amount they last forever. 

Tooth picks

Foam pad- You can't make roses or any kind of flower on a hard surface. These are cheap as chips!

Paint brush and water cup

How to make:

1) Play with the florist paste to warm it up- it should stretch and look a bit like chewing gum when it's ready. Depending on what colour rose you would like to make (you can just do white) put a tiny dot of colour (when I say tiny dot, I MEAN TINY DOT!) Work that into the icing and that way, if you start with a small amount you can build it up. When you aren't using your florist paste, wrap it tight in cling film- it dries out really quickly!

Little tip, the colours darken slightly once the sugar paste model has set, so bear that in mind when colouring. 

2) Dust your work station with icing to avoid sticking and roll out a ball the size of a £2 coin with a rolling pin. Sugar flowers should always be thin!  


3) Put a toothpick through the bottom of your bud, don't push it all the way through. 


4) Once you have rolled your icing, use the small cutter to cut one petal. Put the petal onto the foam pad and use the ball tool. With half the ball on the edge of your petal and the other half on the foam and press down as you run the ball around the petal. 


5) Dampen your paintbrush with water (not too much)and paint around the petal. Then, with the pointed part of the petal facing towards the tooth pick end, attach to your bud. Wrap the petal around the bud and tuck one edge under the other to form a funnel. 


The top of the funnel should have a hole the size of a apple pip. 

6) Roll out a blob of icing the size of a cherry (it seems I have a fruit theme on this post!)and use the small cutter you used on the first bud and cut three petals. To get a clean edge, push really hard and give them a wiggle on the counter or run your thumb along the bottom of the cutter to get rid of frayed edges. 


7) Then ball these petals on a foam pad as you did before for the first petal. Once they are pretty and frilly, flip the petals over and damp your brush with water. Run your brush along the left edge of the petal. Then attach the left edge of one of the petals to your bud. Leave the right side hanging. Then attach the other petals in the same way. They should be evenly spaced to make a propeller shape. 


8) Excuse the dye under my nails... I am just so glamorous these days I tell you. Then dab some water in the inside of the loose corner of each petal. Then fold the loose corner onto the bud. Don't press the petal flat to the bud!


Leave on one of these drying pads. You can get these super cheap online. They are great for setting all types and shapes of flowers!


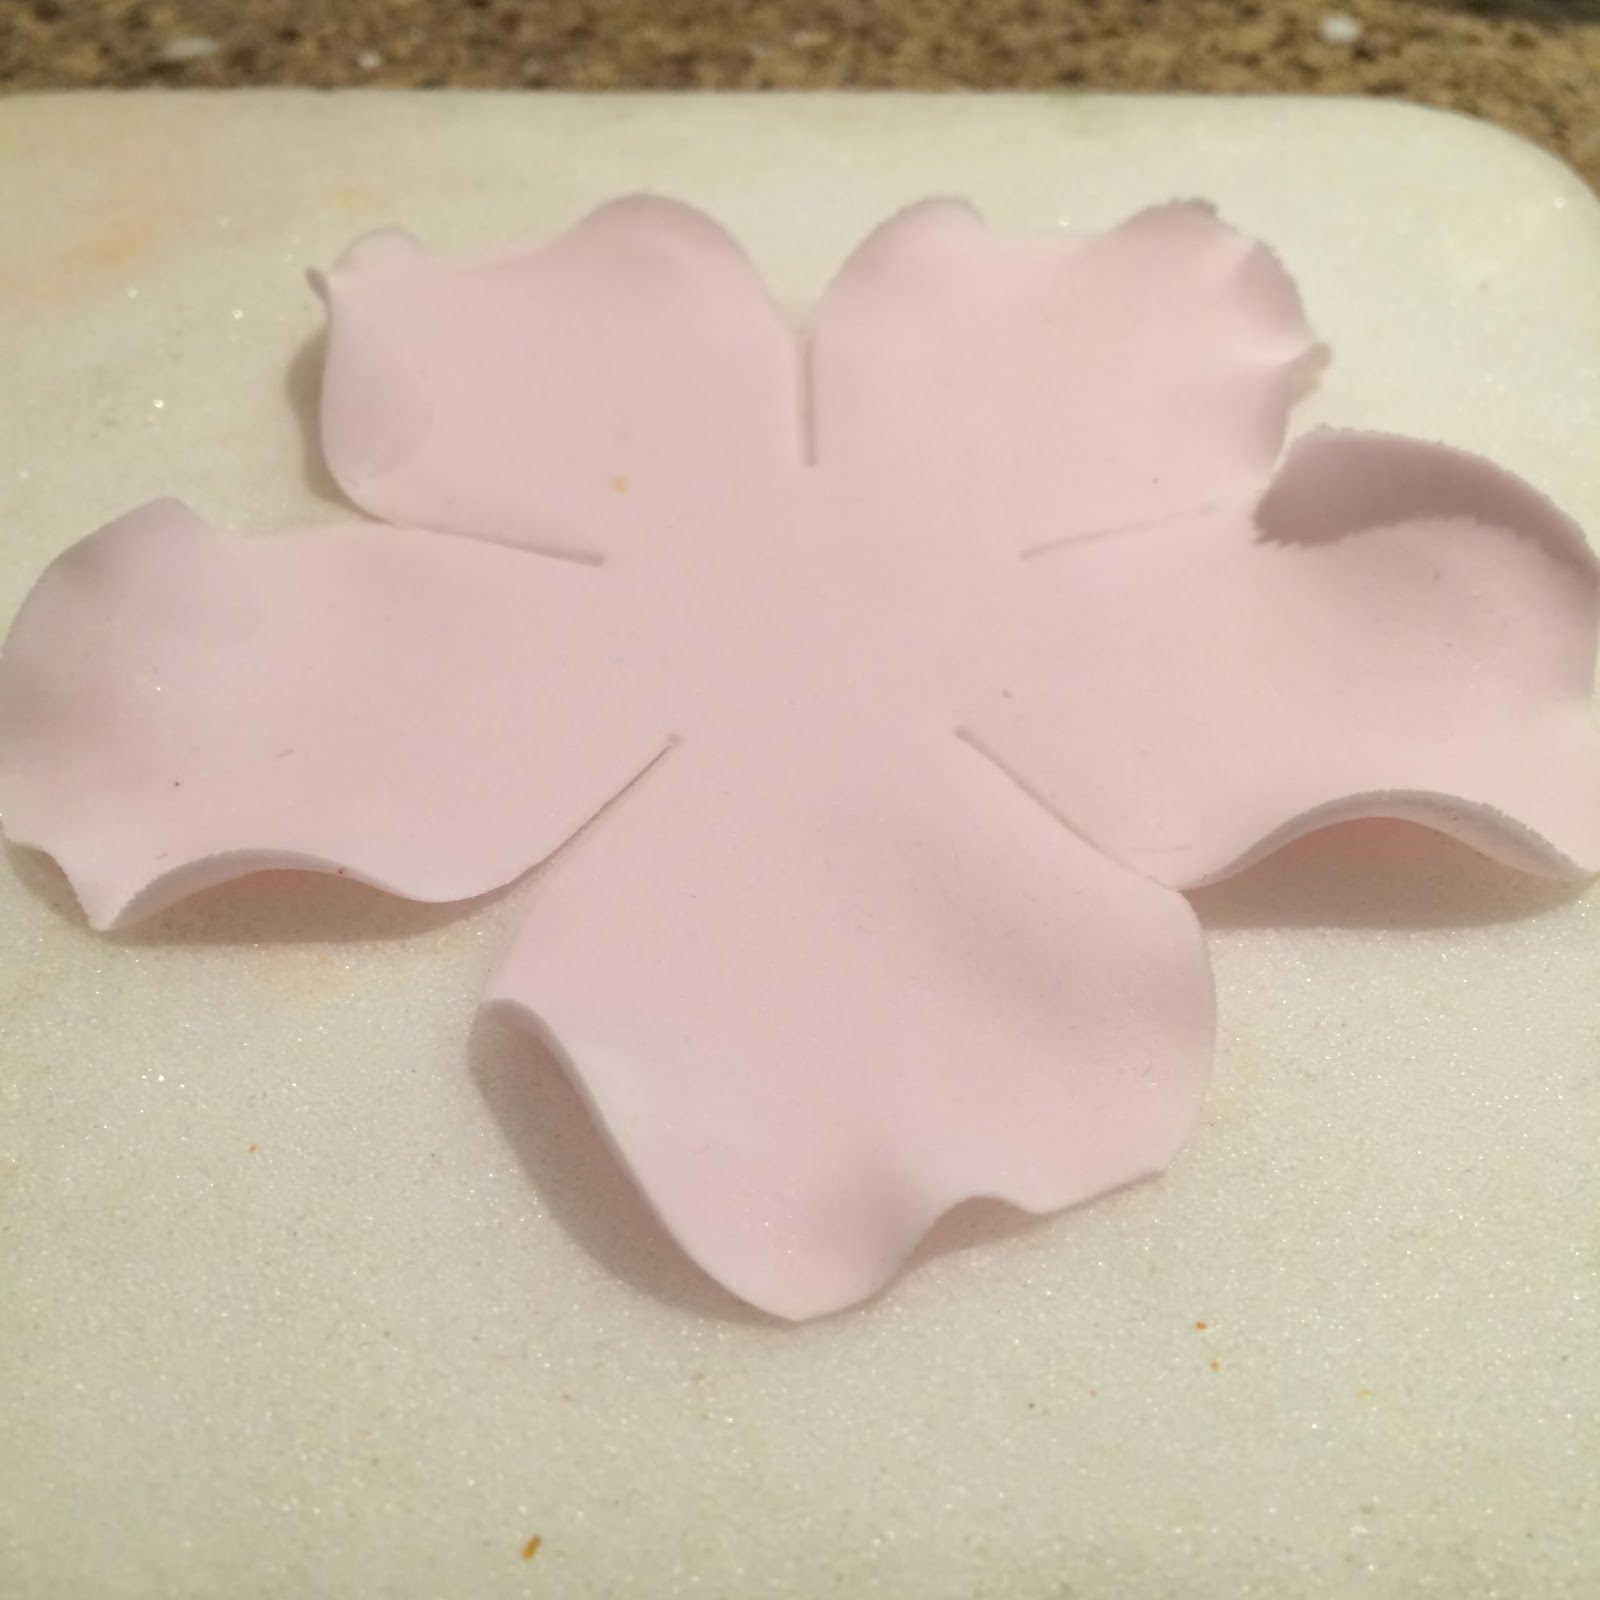
9) So we've upgraded from a cherry to a small plum now! Roll out a plum sized ball of icing(on a surface dusted with icing sugar!) and cut with the plastic 5 petal cutter. Make sure to press down hard and give it a wiggle to ensure clean edges. Then pop your flower onto the foam pad and ball each petal. 


10) Then flip your flower and using a toothpick press down and roll and curl the edges. Don't make them too pointy!


11) Flip your flower again and damp the centre and left side of each petal. Slip your hand under and pierce the middle with your toothpick bud. 


12) Pick up your petal and attach to the bud. Do this the same way you attached the 'propeller' petals. Keep pinching and moving the petals into shape. Keep it loose and natural :) 


Make sure your petals are evenly spaced and if you need to move them about then do! Also avoid the middle of the rose being higher that the outer petals. 


Rest your rose onto the flat side until it's hardened. Using the medium sized cutter, cut 6 petals for your outer petals. 

13) Ball the petals, flip and curl the edges with a tooth pick. 


14) Then flip the petals again and dampen both edges to form a V. With your flower still facing down, attach your first petal, then follow with the rest. It is really important that the six petals are spread evenly. (I imagine it like looking at an orange from above- I'm obviously craving fruit!) Make sure they are the same height as the rest of the petal layers. 


You will need to keep tweaking it to get the shape you want but just avoid flat petals or over curled edges! Then pop on the side to set. You can make these in large batches and they look so beautiful and real. 


Love Hana xxx

Friday, 9 October 2015

Upcyled autumnal twig candle


One way to make yourself look like a bit of a weirdo- collect twigs in public. I did just that last night after getting off the train from work. As I hobbled about in my office attire I felt conscious of the fact that the people around me had stopped their conversations and were staring, so I smiled and said "I know looks a little odd! I'm making something out of sticks!" which as you can imagine didn't help my cause. They just kind of smiled and nodded slowly.

But all in the name of making something pretty for the house and saving money on materials! 


You will need:

Twigs! 

A glue gun

A jar, glass- anything you want to decorate!

Tea lights or small candle

Ribbon

How to make:

Get together your twigs and break them up if need be. You could make yours all the same length,I went for more of a rustic look :)

If they are a little damp, put them on a tray and pop them in the oven at 50 degrees Celsius. Mine were a little damp so I left mine in there for 5 minutes. 

Clean your jar to make sure there isn't any grease on the surface. 

Glue along the twig and attach to the jar. Repeat until the whole jar is covered. 

Wrap a ribbon around the centre and there you go! When the candle is inside, the light shines through the gaps in the twigs. Why not make a few as a feature for your living room? 

Have a great Friday! H xxx