Sunday, 15 November 2015

Popping the collar on Karen Fox


I think one of the coolest jobs in the art industry is jewellery making. To make something unique that someone {or yourself} can wear is like carrying around a piece of their creativity- and that is a very special thing. 

I bought my beautiful ring from Karen Fox, a very talented jewellery maker based in North London. Karen's projects tend to have a historic angle, she finds the Elizabethan era fascinating, with its fine detailing, opulence and dramatic scale. Her 'Ruffle' range is inspired by Elizabethan collars.


Meet Karen Fox:

Karen grew up in a family of engineers and artists in Devon. After moving to London, Karen found herself working in a job which stifled her creativity. After realising that she needed an artistic outlet she enrolled on an evening class at the City Lit in Jewellery and Silversmithing. 

Once Karen's children had started school, she completed a BA (Hons) in Silversmithing and Jewellery at The Cass, London Metropolitan University. Since 2011 Karen has been building up her jewellery business by taking part in shows around the country and selling her work through shops and galleries.  
  
When I asked Karen what her favourite part of jewellery making is she said when things turned out the way she imagined them to be. She talks about making jewellery as being both a physical and mental task and that you are very much in the moment. The handmade techniques of forging and soldering on each piece means that they all have individual quirks. 


As well as making stunning jewellery, Karen enjoys sewing. Her degree show collection was made from pleated and sewn stainless-steel mesh cloth.

" I used to knit, crochet and sew as a teenager- I've made a fair few curious jumpers and trouser shirts in my time!"


Karen's words of wisdom for budding jewellery makers:

"I would advise anyone going into the jewellery business to develop their own personal style and build up their CV as much as possible. By that I mean entering competitions, applying to take part in exhibitions and apply for work experience with established artists."

Karen explained that most of the jewellery makers she knows work in part time jobs elsewhere to support themselves. She said not to expect to make money straight away! She told me how practise is incredibly important and can sometimes provide inspiration.


She's given me the motivation to get my jewellery making box out... 

Have a great week! H xxx


Monday, 9 November 2015

How to do brush embroidery {a quick trick for super pretty cakes}


Happy Monday everyone! I hope you had a lovely weekend. I drove up to Diss, Norfolk- a much needed get away! It was my great aunt's 80th birthday so I made her a cake...


{The gorgeous hotel that was my home for the weekend}

{Everything on the cake was handmade. To know how to make the roses, check my sugar rose tutorial for a step by step guide}


You will need:

  • Flower cutters (or the shape you want to use)
  • A piping bag and size 2 nozzle
  • Royal icing 
  • Thin paintbrush 
  • Pot of water 
  • Kitchen roll or cloth


How to make:

This is a pattern that gives cakes a beautiful finish and is very quick and easy (trust me!)

To make royal icing you only need a tiny amount of water. Add the water drop by drop. You want a fairly thick consistency, to test this, spoon some icing and dribble it back into the icing bowl. If the icing that has dripped off the spoon back onto the icing in the bowl holds its shape for at least 3 seconds you're good to go!

Using the cutters, push them into the cake to give an outline.


Pipe the outline of the flowers. 

Pipe another line in the inside of each petal, do this separately, and with a damp paintbrush pull the icing into the centre of the flower. Clean your brush of icing after each stroke.


Do this for each petal and pipe a centre in the middle of each flower. 

This makes a lovely and delicate pattern which dries hard, so won't smudge! You can do brush embroidery on biscuits too, they make lovely wedding favours. 

Hana xxx 

Tuesday, 3 November 2015

How to make lip balm


I've noticed in the past few weeks the dreaded dry skin has made an appearance. The central heating and weather change makes my skin go mental every year so I am preparing myself for the elements. The best thing about making your own balm is you can customise them however you choose! 

I'm in love with Burt's Bees products, especially as they're natural and aren't tested on animals. So I had a little scout for recipes and came across a simple one that I adapted. 

I've made tea tree lip balm for sore chapped lips, sunflower balm which smells AMAZING and also doubles up as a solid perfume, tinted rose lip balm and lavender lip balm- a calming smell for those who are prone to anxiety. 

{I invited the girls round for a making session, they really got into it!}

You will need:

  • Beeswax (can buy off Amazon!)
  • Shea butter (Amazon too!)
  • Coconut oil (You can get this from any super market)
  • Essential oils
  • Petals 
  • Lipstick (for the tinted balm)
  • Pots- I got mine for a few quid on... you guessed it... Amazon!


How to make:

(This is to make 8-12 pots) 

Heat water in a pan and put a glass bowl over it- making sure the water doesn't touch the bottom of the bowl. 

Scoop a teaspoon of beeswax, shea butter and coconut oil and put into the glass bowl to melt. Wait until the mixture is completely melted. 

For tinted: cut off a chunk of lipstick, I recycled one I haven't used in years! Melt this into the mix.

Turn the heat off, but keep the bowl over the hot water and add the essential oil, do this to your liking. I put 5 drops in mine- you don't want it too strong!

Line up your pots ready, when you take the bowl off the heat the balm solidifies pretty quick so you've got to move fast! 

Pick up your bowl and pour your balm SLOWLY AND CAREFULLY into the pots. Use oven gloves! 


If you want to add petals, make sure they are ready to sprinkle into the hot balm. 

Leave your pots to set on a flat surface, give them at least 12 hours to set and then you are good to go!

{I gave Raz (my bestie at work) a pot of the 'pink peppermint' tinted balm. Her first reaction was "what?! how does it look so professional?!"}


Happy making :) 

Hana xxx


Wednesday, 28 October 2015

Hana meets Odds & Suds!


Odds & Suds

If you’re interested in starting a soap making business, these two are your inspiration. I met with the brilliantly creative couple behind Odds & Suds, a natural handmade soap company.

Jenny has been making soap now for 15 years, a business which started in a cosy kitchen and flourished into the thriving success it is today. 


The story behind the suds 

Jenny originally learned to paint with Annie Sloan and began painting furniture as well as making a furniture polish from turpentine and beeswax. In 2014 she was asked to take part in BBC 2’s Great Interior Design Challenge in Brighton. For her project she decorated a kitchen, giving it a gorgeous rustic French theme. 

Jenny decided that interior design wasn’t her calling and began to make solid hand cream, which she sold for 3 years at Tavistock Pannier Market. Soaps were a natural progression in Jenny’s mind so armed with a soap recipe book, pans and whisks- she took a step into the world of soap making! Soon enough, Odds & Suds out grew the market stall, so Jenny opened her first shop in Tavistock and has never looked back.   


Odds & Suds in the spotlight

Following the success of the Tavistock shop, Jenny opened second shop in Ashburton. The shop and their beautiful house featured in Country Living as part of a 4 page spread.

In 2009, Jenny appeared on one of my favourite programmes, Kirstie’s Handmade Christmas, on Channel 4. She taught Kirstie how to make soap in the Odds & Suds shop. Jenny told me as they settled down on the sofa to watch the show, the orders began pouring in and the website crashed!


{Jenny showing Kirstie the ropes!}

Jenny after her TV appearance: “I drove to the shop and noticed a queue of people outside. I thought that’s funny, they must be waiting for a bus or something. I then realised they weren’t waiting for a bus… they were waiting for me to open the shop. It was crazy, we literally ran out of soap.”

From there it was a change of direction for Odds & Suds. The couple worked hard to transform their horse stables into a work shop fit for producing their soap on a larger scale to enable them to sell to the wholesale market. 

After chatting with the couple about their exciting plans, I got the impression from Jenny that she missed the homely kitchen atmosphere that was once her work area. “I do miss working in the kitchen but we’ve now got the capacity to make 3000 bars a week, so it’s still artisan but just not as cosy! I think a lot of producers get to that point, you become very busy with what you’re doing and you make that leap to become a producer.”

She described any crafting business as making monsters that need constant feeding and I couldn’t agree more! 


The Odds & Suds family

Today, Jenny owns the shop in Tavistock, Kelly runs and owns the Odds & Suds shop in Ashburton, Rosy has her own Odds & Buds florist and Matthew owns a tanning shop in Tavistock called Odds & Sun and also works in theatre production. 


Jenny’s tip for crafters:

“Keep it simple! So many crafters fall into the trap of doing too much but actually less is more.” 

For those of you wanting to go into soap making to sell, you have to have your products tested to make sure they are safe to the general public.


Jenny and John will be at The County Living Christmas Fair (Islington's BDC from 11 – 15 November). Their shops are already stocked for Christmas and if you aren't able to swing by then check them out online at www.oddsandsudstavistock.com or telephone 01822 618111- I've already placed my order! 

Hana xxx 


Tuesday, 20 October 2015

Hana meets Zeena Shah! {blog hop}


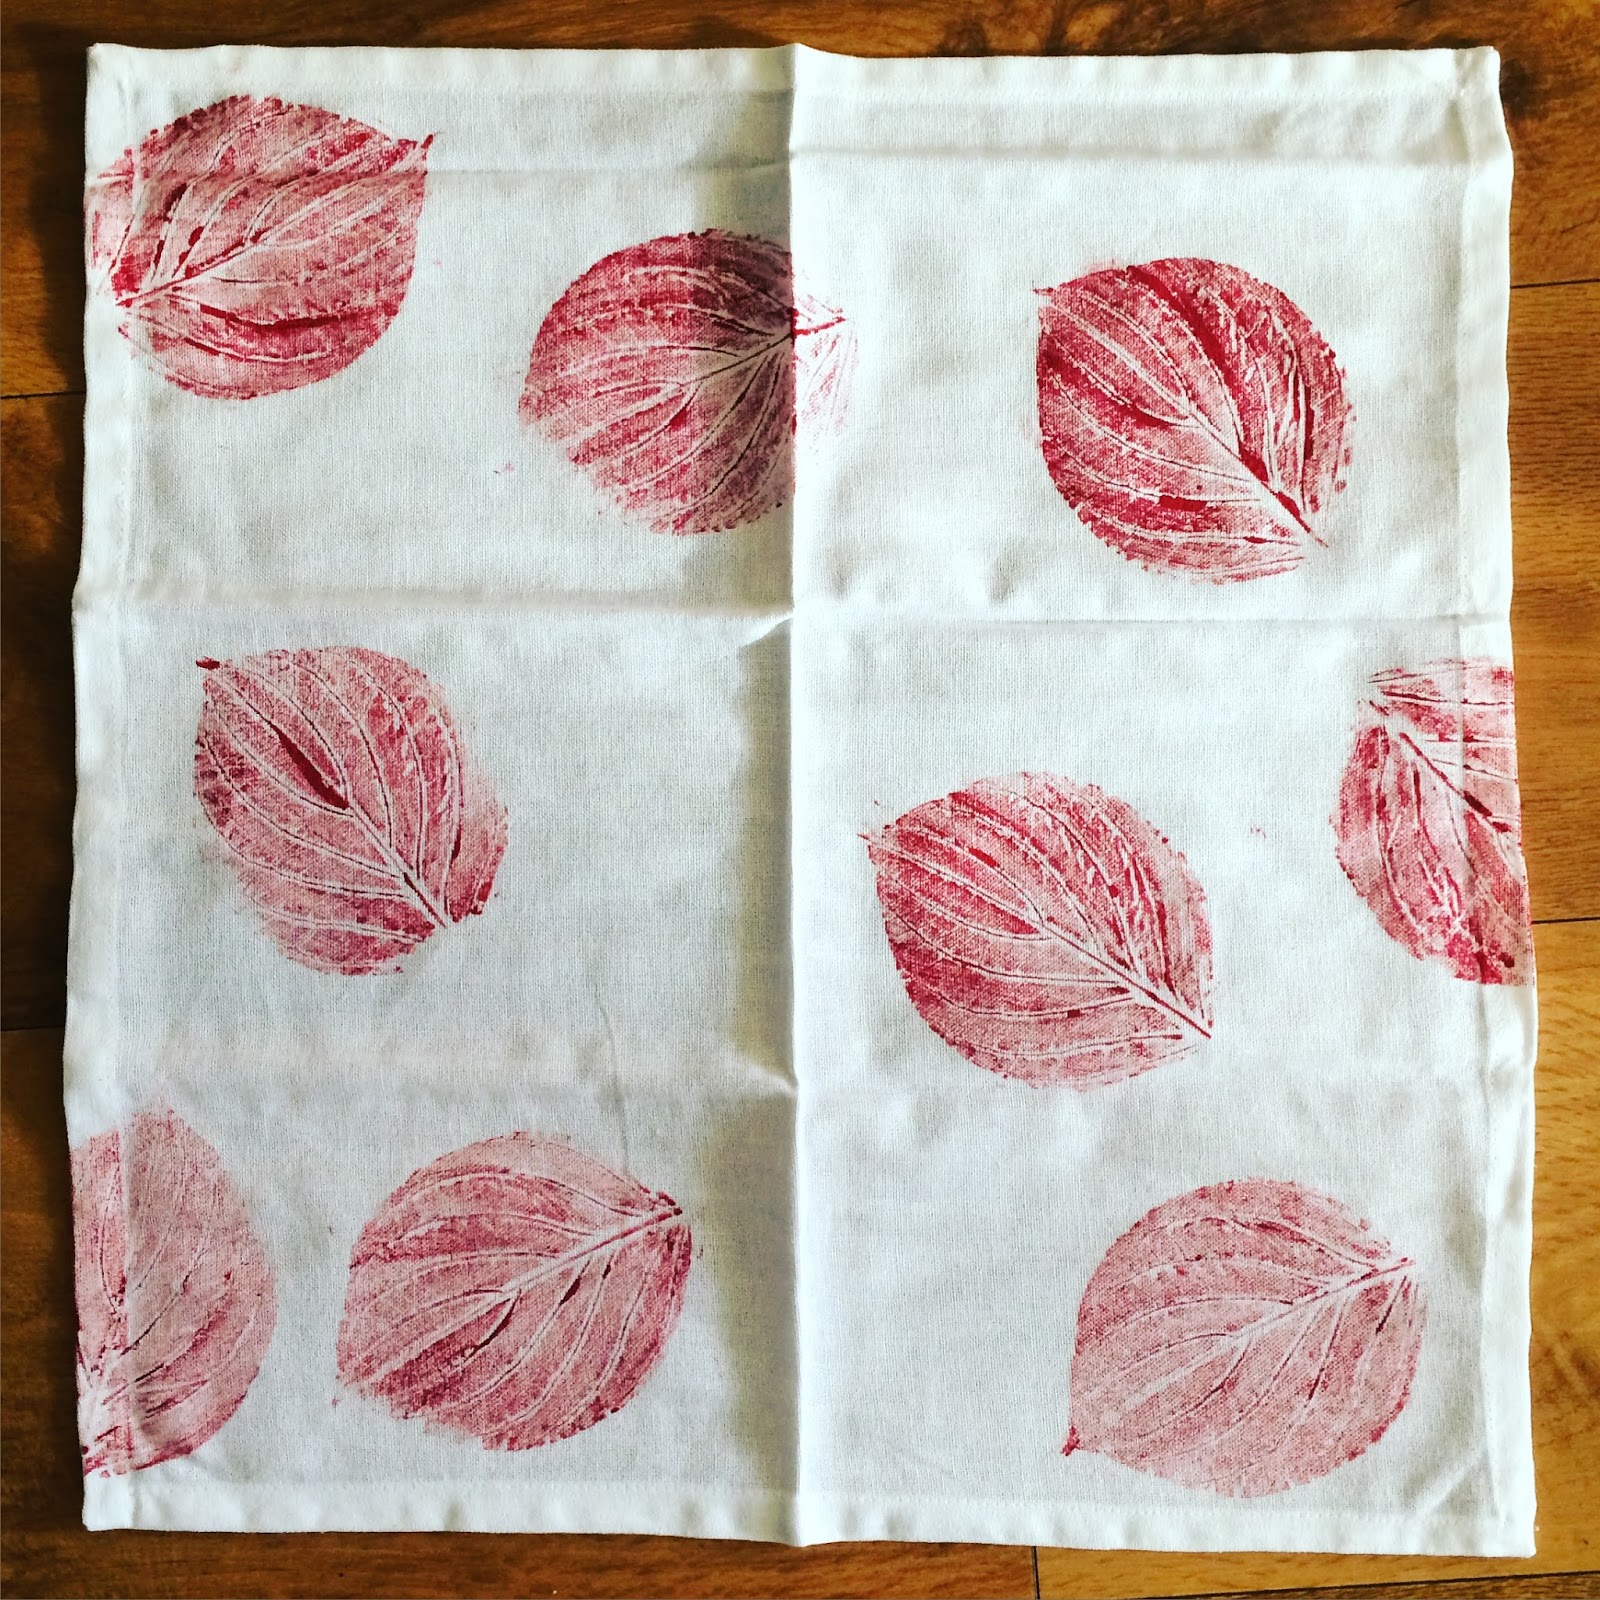
I was asked by the team at Stitch Craft Create {http://ideas.stitchcraftcreate.co.uk/how-to-print-fabric-blog-hop/} to take part in a 'blog hop' for Zeena Shah's brilliant new book- How To Print Fabrics. I've given her fallen leaf tea towel design a go and free styled a bit with some napkins! 


If you are into fabric printing, textiles or creating gorgeous home accessories Zeena really is your girl. Her book is so easy to follow and her projects are for all abilities. It's full of different mark making ideas, pillows, bags, screen printing and more, which are all right up my street. 


Funnily enough, I met Zeena at Kirstie Allsopp's Handmade Fair in September and took one of her workshops! She taught us how to make lino printed stationary, which was great fun and very effective. 


You'll need to grab a copy of the book {shameful plugging of me there} to know how to make these cheeky little numbers- I've already ordered mine! Just follow the link- http://www.stitchcraftcreate.co.uk/how-to-print-fabric#.VidFcsZVhHw


Love Hana xxx

Turn your jeans into a wheat bag!


It's that time of the year when everyone seems to be dropping like flies. Everywhere I go I'm followed by constant sneezes, bunged up noses and sniffles. When you're poorly you just want to get cosy on the sofa in your jim jams so I've made the ultimate lavender scented sickness buddy. 

Throughout my life I've always had a wheat bag, you know, one of those things you bung in the microwave and cuddle up with. They are also my first point of call when I have any aches or pains!  

These are super easy to make and a great way to recycle your old jeans or jumpers!


You will need:

  • Cotton based jeans or a jumper sleeve
  • For your filler you can use: Uncooked rice, wheat, oats, seed feed. {I used rice}
  • Sewing machine or hand sew with needle and thread
  • Lavender {you can use other scents!}
  • Lavender oil  
  • Dress makers pins

How to make:

Cut one of the legs or sleeves of your jeans or jumper to a legnth you would like your bag to be. Give yourself an extra inch for when you sew.


Turn the material inside out and fold over each end and pin down. 


I still don't own a sewing machine {it's on the wish list!} Sew above the pins, making sure your stitches are close together. 

Do the same for the other end but leave a gap of 2 inches. 

Turn your fabric back the right way by feeding it through the gap you've left. 

Then in a bowl mix your filling with picked lavender and 5 drops of oil. Use a funnel and pour the mix into the bag. 

Sew up the 2 inch gap and if you have a little label then you can stick that in there too! I've got little cute ones I ordered online which say 'handmade by Hana' on. 

And that's it! I wanted to keep mine simple but you can decorate these in any way you choose- just check the material is microwavable. 


Hana xxx


Sunday, 18 October 2015

Pumpkin spiced cake with cinnamon frosting


Pumpkin is a magic ingredient in cakes, it gives a super moist texture and goes amazingly well with spices. 

Quite a few recipes will tell you to use canned or tinned pumpkin {I'm not even sure if we have that in the UK?} but I think it's much nicer to use a fresh pumpkin. If you want to make it extra special, pick your own!  

I've never used one of these tins before and wondered where they originated. Turns out bundt {the d is silent} tins originated in Germany, Austria and Hungary and were called bundkuchen. 


You will need:

  • 290g Plain flour
  • 2 tsp of baking powder
  • 2 tsp of baking soda
  • 2 tsp of ground cinnamon 
  • 1 tsp of all spice
  • 1/2 tsp ground ginger
  • 1/2 tsp salt
  • 330g pumpkin
  • 4 eggs
  • 230g unsalted butter 
  • 130g granulated sugar
  • 35g brown sugar
  • 190ml buttermilk 
  • 1 tsp vanilla
{For the frosting}
  • 200g icing sugar
  • 50g royal icing sugar 
  • half a tub of cream cheese
  • 50ml buttermilk
{Cinnamon dusting}
  • 1 tbsp fine brown sugar
  • 1 tbsp ground cinnamon


How to make:

Pre heat your oven to 180 degrees Celsius and grease your tin with butter.

Weigh out your pumpkin {cut into slices and remove skin} and steam until soft. Should take about 20 minutes. Leave aside to cool.

Whiz the pumpkin down with a blender or food processor and mix with the vanilla and buttermilk. Leave on the side. 

Cream the sugars with the butter until pale and fluffy. Add eggs in gradually. Mix in flour, raising agents and spices.

Combine both mixes together. Line a tin with foil, put the seeds in the tin and cover with brown sugar . 

Pour the mix into the bundt tin and pop in the oven for 40 minutes and the seeds for 15. 

Whilst the cake is in the oven mix together the icing ingredients, make sure it's not too runny- if it is then throw in some more icing sugar. 

Spoon on the icing and allow it to trickle down. Sprinkle the cinnamon sugar over the icing then the seeds.


I enjoyed a cheeky little slice of this with my best friend and it was the first time she had pumpkin cake and she loved it! 

Have a good week! H xxx