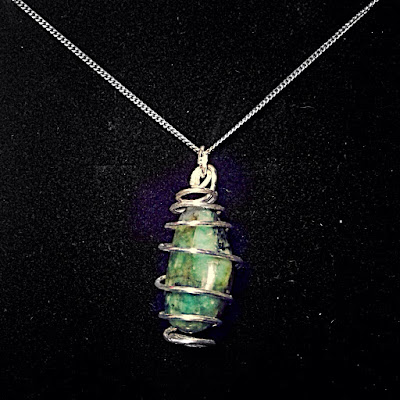
And breathe...you've done it, Monday is over for another week! Luckily for me, Monday's are my work-from-home days so they tend to be spent in pajamas and drinking copious amounts of tea. After writing my nature notes for the paper I made a quick 'demo pendent' to show you guys!
So the pendant above was a leaving present for my sister, Georgia, who has flown the nest to Newcastle University. The crystal inside is an Emerald, which is her birthstone (May). I bought it from my local 'spiritual shop', as I call it, Harvest Moon in Hitchin. These pendents are very easy to make and all the bits and bobs you'll need are pretty cheap and re-usable, so it's a win win.
You will need:
- Silver wire. I buy mine off amazon and prefer silver wire, rather than silver plated wire. It's a bit more expensive but lasts and doesn't loose it's shine! I get mine from Amazon at around £10 for 5 ft- you can make loads of jewellery with that!
- Jewellery making tools. Again, mine's an Amazon jobbie. I got the kit (with bits not in the photo) that you can see below for £15.
- A bead, crystal or whatever else you want to pop into your wrap! I cut up old bracelets or like for my sister's one, use a whole tumbler crystal.
How to make a crystal wrap pendant:
Start by using your circular pliers to make a loop. Keep it attached to the main roll of wire for now.Then by keeping the loop secure with the flat pliers, begin to coil the wire around the loop.
Keep coiling until you are happy with the size of the swirl. You will need to do this by eye, depending on how big your crystal is. If your crystal is 2 cm in height, you will need your first rolled coil to be 2 cms.
Again, a little bit of a guess, but giving yourself a good enough length (remember it doesn't matter if it's too long, you can always trim it down!)cut the silver coil away from the rest of the silver reel.
Then, starting at the end, just do exactly the same as what you did before!
You should end up with this...
Both spirals don't have to be identical, it's all going to be part of the same spiral. Fold one loop over the other. So you are with something that looks like a clam.
Then using the coiling pliers that you started with, push and shape the spiral.
(note to self: paint nails before taking photos.)
It may need a bit of pinching or pulling to get into the right shape!
Then, slip your crystal into one of the gaps and wiggle it in. Don't worry if it gets a bit stretched or wonky, you can easily bend it back with your tools.
Then, using tweezers- eyebrow ones will do the trick, pull and bend one of your starting loops so that it's sticking up.
Then using one of these handy little fellas, attach it to the loop.
And that's it! They make lovely presents with a personal touch. Maybe choose the person's birthstone or if you believe in the healing powers of a crystal, choose one that could give them a little helping hand.
Have fun with this one, you will be surprised at how easy it is!
Good night!
H xx


No comments:
Post a Comment